Warning: This is my very first post on Medium and I’m not a native english speaker, so please try to go easy on me…
Introduction
Web development has a hole has been changing really drastically since the inclusion of Cloud Services to the play, new ways of developing and maintaining back-end systems and web applications have being created.

With this, there is one of the architectures that has gain more interest across developers, this is the Microservice Architecture. The Microservice architecture is the act of creating independent processes that can be more maintainable and scalable than a monolithic server. It can be applied using different technologies, some of them are Docker or Serverless, but in this post we are going to focus on Serverless.
What is Serverless?
Serverless is a framework that allows you to create backend applications using the infrastructure existing on the cloud (AWS, Azure, Google Cloud). Thus, you can focus on the more relevant things of your application, like business logic, features and the interaction between the modules of your software.
Serverless Framework is your single toolkit for deploying serverless architectures to any provider. You build the features, we configure the infrastructure. Done.

So lets begin…
I’m going to teach you how to create two API services to store and retrieve tasks from a todo list, this tasks will be store in DynamoDB so we are going to use the aws-sdk to comunicate with those services.
For this tutorial I’m going to use Amazon Web Services so you’ll need a valid API credentials and you’ll have to configure them on the credentials file to allow Serverless comunicate with the Amazon Services.
To start we’ll have to install Serverless so we can use the CLI tools to create, configure and deploy our application.
npm install serverless -gAfter installing we can check that the package was correctly installed by using serverless -v .
Now that we have installed serverless we can start building our application, the CLI provides us a very easy way to start a new proyect using the following command.
serverless create --template aws-nodejs --path todoNow if everything worked fine we’ll be able to see a folder called todobeing created and the tree should look as following:

The serverless.yml file contains the configuration of our application, such as the name of the services that we are going to create, the version of the programming language that we are going to use, AWS IAM role permissions, among other configurations that you can find in the Serverless docs.
service: todo # name of your application/service# All the information about the cloud service, it might change depending of which one we are using.
provider:
  name: aws # Specify Amazon Web Services
  runtime: nodejs6.10 # Programming language plus versionfunctions:
  hello: # name of the service
    handler: handler.hello # function that is going to handle the logic
For simplicity I removed the comments that are being added by the CLI tool when creating the base app.
The handler.js file will contain the logic of our application, from here we can start writing the code of our application.
'use strict';module.exports.hello = (event, context, callback) => {
  const response = {
    statusCode: 200,
    body: JSON.stringify({
      message: 'Go Serverless v1.0! Your function executed successfully!',
      input: event,
    }),
  };callback(null, response);// Use this code if you don't use the http event with the LAMBDA-PROXY integration
  // callback(null, { message: 'Go Serverless v1.0! Your function executed successfully!', event });
};
In the handler.js we can see something more familiar, regular Javascript code will be handling our application’s logic, each handler function accepts three parameters: event, context and callback.
Event: this is an object that contains all the parameters coming from the client/requester, such as body, query parameters and the headers.
Context: this is an object added by AWS which contains the information about the environment and the instance of the function.
Callback: function called at the end of the process to notify AWS that our task finished or to send back information to the requester, the callback has two parameters, the first one is an error and the second one is all the information that we want to send to the client.
To run the demo app we can do:
serverless deployAfter we know this we can start creating our own services, first I’m going to remove everything under functions in the serverless.yml file, and I’m going to add two new functions as follows:
Apart from creating the configuration for both of the services, I’m adding the base configuration for the rol I’m going to use to store and retrieve the tasks in DynamoDB.
This is going to create a new IAM role on AWS with the proper permissions to do the actions needed in our application. i.e: access to RDS instances, DynamoDB, Elasticache, among others.
Next in the handler.js file we are going to add both of the functions to create and retrieve tasks, the sample create function using Dynamo can be as follows:
Note: you should first create the table on DynamoDB from the Amazon dashboard, in this case the name is
todoList-items.
Then we have the retrieve function that can be as follows:
Note that for both functions we are using the aws-sdk to interact with Amazon services.
Now the following step would be to deploy our finished services, we can do this using the following command:
serverless deploy --stage dev --region us-east-1Then we’ll see the process that serverless is doing in order to upload, configure and deploy our code.
You should be able to see something like this:

At the end you’ll get the endpoints needed to call the services, you’ll get one for each of the services that you create, in this case we got two.
After the process is finished we can test our endpoints using Postman, doing something like this:
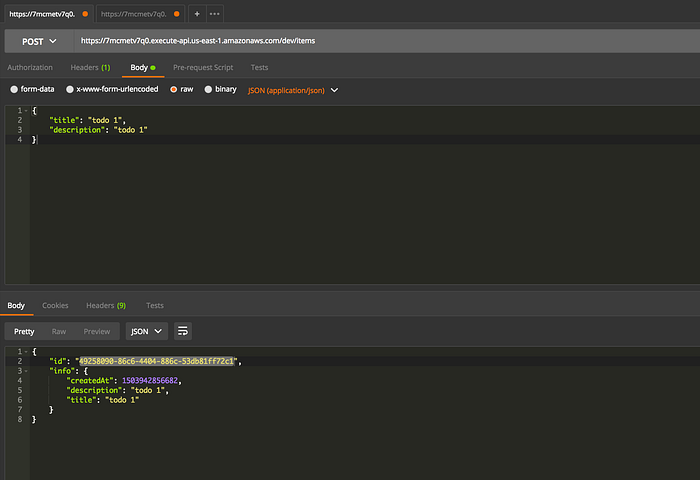
As you can see we get a valid response from the service, and we can confirm the addition of the task going to the AWS dashboard and looking at our DynamoDB table.

To test the second service we can do the same, paste the endpoint in Postman adding the id of the just created item at the end and we get the following response:

Conclusion
As we saw in this tutorial, Serverless help us to focus on the relevant things of our application, it does most of the dev ops work for us and enable us to develop back end systems faster and with a great scalability.
To find a better insight on the previous tutorial you can take a look at a full todo list CRUD with ES6 and some of the Serverless best practices in my github repo: https://github.com/xoscar/serverles-todoList
I hope you have enjoyed this tutorial and I’m going to prepare more like this related with AWS/Serverless and Node.js, if you have any questions please let me know or contact me at oscar-rreyes1@hotmail.com